Your single-pane windows are likely costing you over $400 a year in wasted energy—the equivalent of a car payment.
- Material choice is critical; vinyl can warp and compromise seals over time, while fiberglass offers superior longevity.
- Installation errors, like improper caulking, are a primary point of failure that can void warranties and cause structural rot.
Recommendation: Conduct a seal failure audit on your north-facing windows first, as they represent the highest potential for immediate savings.
For homeowners in older houses, the winter draft is a familiar, unwelcome guest. You turn up the thermostat, but a persistent chill still creeps in from the windows, sending your heating bills soaring. The common advice is to simply replace them. But this approach treats a symptom, not the disease. The real issue isn’t just that your windows are old; it’s that they are a significant, quantifiable financial liability bleeding your household budget dry every month.
Most homeowners focus on the upfront cost of new windows, overlooking the compounding cost of inaction. This isn’t just about feeling a draft; it’s about structural integrity, air quality, and tangible financial loss. But what if you could approach window replacement not as a mere expense, but as a strategic, calculated investment? The key isn’t just buying new windows, but understanding the precise points of failure in your current ones—from material science to hidden installation flaws. This is a forensic audit of your home’s thermal envelope.
This guide moves beyond generic advice. We will dissect the technical specifications on window labels, analyze the long-term performance of different frame materials, and expose the critical installation mistakes that can lead to catastrophic failure. By understanding these factors, you can make a decision that doesn’t just stop drafts but delivers a verifiable 20% reduction in your energy costs, effectively turning a major home improvement project into a performing asset.
To navigate this complex decision with clarity, this article is structured to walk you through each critical checkpoint of a proper window audit. From deciphering energy labels to identifying the subtle signs of seal failure, you will gain the knowledge needed to make a sound, profitable investment in your home’s efficiency and comfort.
Summary: Window and Door Replacement: How to Cut Your Heating Bill by 20% This Winter?
- Why Single-Pane Windows Are Costing You More Than a Monthly Car Payment?
- How to Read U-Factor and SHGC Labels Like a Pro Before Buying?
- Vinyl vs. Fiberglass Windows: Which Frame Won’t Warp After 10 Years?
- The Caulk Mistake That Lets Moisture Rot Your Window Sills
- When to Replace Windows: Signs of Seal Failure You Can’t Ignore
- The Ventilation Error That Cooks Your Shingles From the Inside Out
- How to Choose an Air Purifier That Actually Removes Traffic Fumes?
- Repainting the Walls: How to Achieve a Streak-Free Finish Like a Pro?
Why Single-Pane Windows Are Costing You More Than a Monthly Car Payment?
The draft you feel from a single-pane window is the physical sensation of money leaving your home. These outdated windows offer little more insulation than a simple hole in the wall, forcing your heating system to work overtime just to maintain a baseline temperature. This isn’t a minor inefficiency; it’s a significant, recurring financial drain. The U.S. Department of Energy quantifies this loss, stating that replacing single-pane windows with energy-efficient models can save a homeowner between $126 to $465 per year. For many in older homes, that figure lands squarely in the upper range, rivaling a typical monthly car payment.
Consider the documented experience of homeowner Devin R. from Tennessee. After replacing his home’s old windows, he reported an average of 20% in energy cost savings, which translated to approximately $450 annually. This isn’t an abstract number; it’s a tangible return on investment that directly offsets the cost of the upgrade. The “total cost of inaction” becomes clear: every year you delay, you are effectively spending hundreds of dollars with zero return, all while enduring a less comfortable home.
The performance difference is rooted in thermal dynamics. A window’s resistance to heat flow is measured by its U-Factor, where a lower number indicates better insulation. As the following comparison shows, the gap between single and double-pane technology is not incremental; it’s a monumental leap in efficiency.
| Window Type | U-Factor | Energy Loss Reduction | Installation Cost |
|---|---|---|---|
| Single-Pane | 0.90-1.10 | Baseline | $100-$300 |
| Double-Pane | 0.30-0.50 | Up to 50% | $400-$800 |
This data illustrates that a modern double-pane window can cut heat loss by up to 50% or more compared to its single-pane predecessor. Keeping single-pane windows is not a “frugal” choice; it’s an ongoing subscription to energy waste.
How to Read U-Factor and SHGC Labels Like a Pro Before Buying?
Walking into a showroom without understanding window energy labels is like navigating without a compass. The National Fenestration Rating Council (NFRC) label on every new window provides the critical data points you need, but they are meaningless without context. The two most important metrics for a homeowner concerned with heating bills are the U-Factor and the Solar Heat Gain Coefficient (SHGC). The U-Factor measures how well a window prevents heat from escaping, making a low number essential for cold climates. The SHGC measures how much solar heat it lets in; a higher number can be beneficial in winter for passive heating, while a lower number is better for hot climates to reduce cooling costs.
Simply looking for a low U-Factor is not enough. A window’s overall performance depends on a balance of factors, including its air leakage (AL) rating. As the experts at Locktight Impact Windows astutely point out in their “Guide to Understanding Window U-Factor SHGC Ratings”:
A window with a great U-factor but high AL is like a winter coat with a broken zipper—the insulation is useless.
– Locktight Impact Windows, Guide to Understanding Window U-Factor SHGC Ratings
This highlights the need to view the window as a complete system. The right choice is entirely dependent on your geographical location. The ENERGY STAR program provides clear guidelines based on climate zones, ensuring you select a window optimized for your specific environment. A window that is highly efficient in Florida would be a poor choice for a home in Minnesota.
To make an informed decision, use this climate-based guide:
- Northern Climate: Prioritize a U-Factor of 0.22 or less to minimize heat loss. An SHGC of 0.17 or higher can help capture passive solar heat during winter.
- North-Central Climate: Target a U-Factor of 0.25 or less, with a balanced SHGC between 0.30 and 0.40.
- South-Central Climate: Look for a U-Factor of 0.28 or less and a low SHGC (at or below 0.23) to reduce cooling loads.
- Southern Climate: Focus on the lowest possible SHGC (under 0.23) to block solar heat, with a U-Factor of 0.32 or less.
Always verify that the label shows NFRC certification to ensure the ratings reflect the performance of the entire window unit, not just the glass.
Vinyl vs. Fiberglass Windows: Which Frame Won’t Warp After 10 Years?
The glass in a window gets all the attention, but the frame material is what determines its long-term stability and performance. For decades, vinyl has been the go-to budget-friendly option. However, from an auditor’s perspective, its primary weakness lies in its high thermal expansion coefficient. Vinyl expands and contracts significantly with temperature changes. This constant movement puts stress on the window seals, which can lead to premature failure, drafts, and condensation between the panes—often within 10 to 15 years.
This is where fiberglass emerges as a superior long-term investment. Fiberglass is a composite material with a thermal expansion rate that is almost identical to glass. This material synergy means the frame and the glass expand and contract together, dramatically reducing stress on the seals. A 15-year cost-of-ownership analysis revealed that while fiberglass windows have a higher initial cost, their lifespan can be up to 50 years or more, compared to just 20-30 years for vinyl. This durability means the seal integrity is maintained for decades, preventing the performance degradation that plagues many vinyl products.
This illustration highlights the structural differences between common frame materials, showing why some are more prone to failure than others.
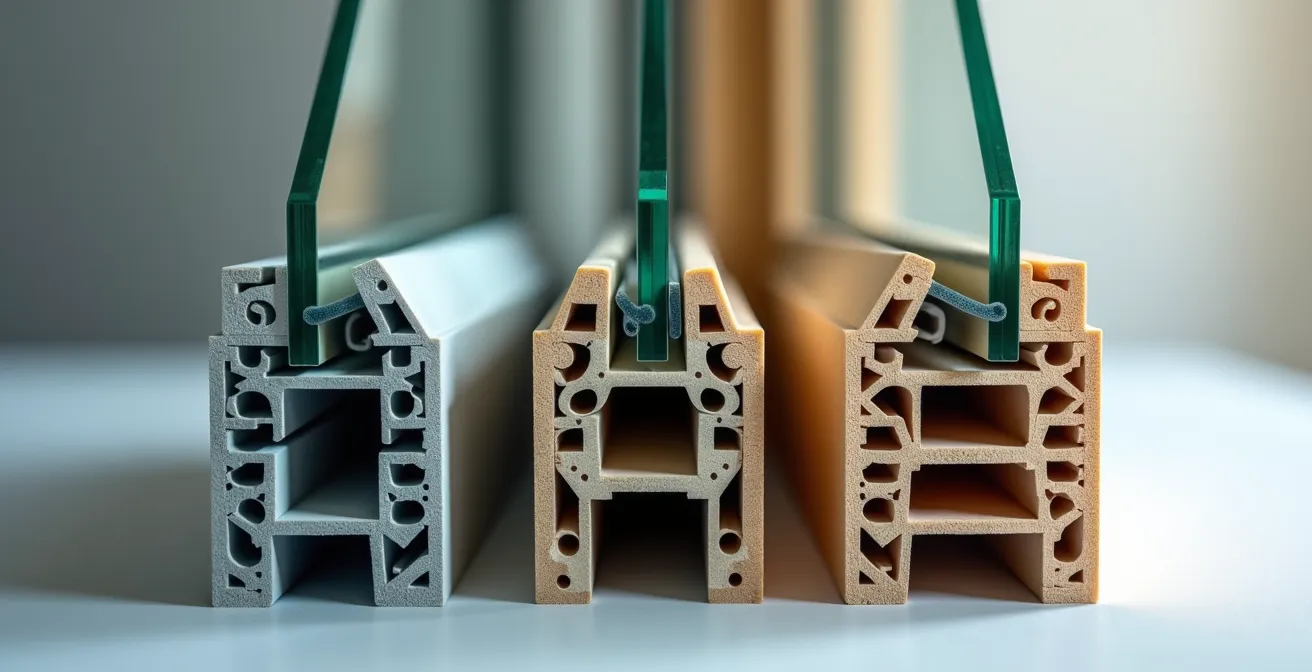
As you can see, the choice of material has profound implications for the window’s structural integrity over its lifetime. The strength and stability of fiberglass—up to 8 times stronger than vinyl—ensure it will not warp, crack, or rot, preserving the airtight seal that is critical for energy efficiency.
The following table provides a clear breakdown of how these materials stack up in the key performance areas that matter most for durability:
| Material | Strength | Lifespan | Thermal Expansion | Cost per Window |
|---|---|---|---|---|
| Vinyl | Baseline | 20-30 years | High (can warp) | $520-$730 |
| Fiberglass | 8x stronger than vinyl | 50+ years | Minimal (matches glass) | $600-$1,200 |
| Composite | 3x stronger than vinyl | 40+ years | Low-moderate | $700-$1,000 |
The Caulk Mistake That Lets Moisture Rot Your Window Sills
You can invest in the highest-rated, most expensive fiberglass window on the market, but its performance is entirely negated by a poor installation. The single most common and destructive installation error is improper caulking. Caulk is the final seal between the window frame and your home’s structure, but it is often applied incorrectly. A frequent mistake is applying a new bead of sealant directly over old, failing caulk or on a dirty, unprepared surface. This creates a purely cosmetic seal with no real adhesion, allowing water to penetrate the gap and seep into the wall cavity and window sill.
This moisture intrusion is insidious. It can go unnoticed for years, slowly rotting the wooden structure around the window from the inside out. By the time you see water stains on your interior wall, the damage is already extensive. This is why a proper installation requires meticulous preparation: removing all old sealant, cleaning the surfaces with a solvent, and using a high-quality, flexible sealant rated for exterior use. Furthermore, the installation must include correctly applied flashing tape around the window’s nailing fin before it’s even set in the wall. This tape is the primary waterproofing barrier; the caulk is just the secondary, visible seal.
The financial stakes of a bad installation are enormous. As the installation experts at Glass Doctor warn, the consequences go beyond energy loss:
Improper installation can void a multi-thousand-dollar product warranty.
– Glass Doctor, Step-by-Step Window Replacement Guide
This means a small saving on a cheaper installer could cost you the entire value of your investment. When vetting an installer, you are not just paying for labor; you are paying for the expertise to protect your home and your warranty. Use this checklist to audit a potential installer’s work or diagnose issues with existing windows.
Action Plan: Auditing for Installation Integrity
- Check for Gaps: Inspect the space between the window frame and the wall opening. Visible, uneven gaps indicate poor shimming and a potential for air leakage.
- Examine the Caulk Line: A professional job will have a clean, smooth bead. Caulk applied over dirt, paint, or old sealant is a major red flag for future failure.
- Ask About Flashing: A reputable installer should be able to explain exactly how they install flashing tape around the window perimeter as a primary water barrier.
- Look for Water Stains: Check the interior walls, sills, and flooring directly below windows for any signs of discoloration, which points to an active leak.
- Test Window Operation: A newly installed window that is difficult to open or close may not have been set square and level in the opening, which puts stress on its components.
When to Replace Windows: Signs of Seal Failure You Can’t Ignore
Knowing when to replace a window goes beyond seeing a crack in the glass. The most critical sign to watch for is seal failure in double or triple-pane units. These windows are filled with an inert gas (like argon) between the panes to improve insulation. The perimeter of the glass is sealed to hold this gas in. When that seal breaks, the insulating gas escapes and is replaced by regular air. Moisture in the air then gets trapped between the panes, leading to the telltale sign you cannot ignore: condensation or a foggy film on the *inside* of the glass that you can’t wipe away.
This fog is not just a cosmetic issue; it’s a definitive indicator that your window’s insulating properties are gone. It has reverted to being little better than a single-pane window, and its U-Factor is now significantly higher than what you paid for. Other subtle signs include a noticeable increase in outside noise or feeling a distinct cold spot near the window glass in winter. These symptoms mean the window is no longer performing its function.
This image shows exactly what to look for—the undeniable evidence that a window’s insulating seal has been compromised.

For homeowners on a budget, replacing all windows at once may be unfeasible. In this case, a strategic, phased approach is the most logical path forward. By prioritizing the most problematic windows, you can maximize your return on investment and improve comfort where it’s needed most.
Follow this priority plan for a phased replacement:
- Phase 1: North-Facing Windows. These windows receive little to no direct sunlight in winter and are responsible for the highest heat loss. Replacing them first provides the most significant impact on your heating bill.
- Phase 2: Windows with Obvious Seal Failure. Any window showing condensation between the panes is a prime candidate for immediate replacement as it is no longer energy-efficient.
- Phase 3: Bedroom Windows. Upgrading windows in sleeping areas can drastically improve comfort and provide superior noise reduction for a better night’s sleep.
- Phase 4: West-Facing Windows. These windows get blasted by the hot afternoon sun in summer. Replacing them with units that have a low SHGC will help lower cooling costs.
- Phase 5: Remaining Windows. Address any other windows based on visible damage, drafts, or difficulty of operation.
The Ventilation Error That Cooks Your Shingles From the Inside Out
While the title points to the roof, the root cause of many household thermal problems—including attic temperature issues—originates with uncontrolled air leakage at ground level. Your house is a system. A “ventilation error” isn’t just about attic fans; it’s about the uncontrolled exchange of air throughout the entire structure. Old, drafty windows are a primary source of this uncontrolled ventilation. They create a constant, chaotic flow of cold air in and warm air out, forcing your HVAC system into a state of perpetual catch-up.
This constant air exchange disrupts the intended “stack effect” of a well-sealed home, where air flows in a controlled manner from low to high. When windows leak, this system is broken. The pressure imbalances can pull unconditioned air from crawlspaces or, conversely, force conditioned interior air into the attic. When warm, moist interior air is constantly pushed into a cold attic during winter, it can lead to condensation on the underside of the roof sheathing. This moisture can degrade the shingles from below and contribute to ice dams—a far more costly problem than a high heating bill.
Therefore, sealing the building envelope at its weakest points—the windows and doors—is the foundational step to gaining control over your home’s entire ventilation system. By installing modern, well-sealed windows, you stop the chaotic air leaks. This stabilizes the pressure within your home, allowing your ventilation system (both mechanical and passive) to function as designed. It ensures that the only air entering and leaving your home is doing so through controlled pathways, not through every crack and crevice around a warped window frame. Addressing your windows is not just a window project; it’s the first and most critical step in managing your home’s entire thermal and atmospheric health.
How to Choose an Air Purifier That Actually Removes Traffic Fumes?
Before you even begin to research HEPA filters and carbon layers for an air purifier, the first question an energy auditor would ask is: “How are the pollutants getting in?” An air purifier is a reactive measure; it cleans the air that is already inside your home. The most effective strategy for improving indoor air quality (IAQ) is a proactive one: stopping pollutants at the source. Your windows and doors are the primary gateway for outdoor contaminants, from pollen and dust to harmful traffic fumes (particulate matter 2.5) and industrial emissions.
Modern, high-performance windows are engineered not just for thermal efficiency but also for a superior seal against air and water infiltration. A window with a low Air Leakage (AL) rating (typically 0.30 cfm/ft² or lower) acts as your home’s first and most important air filter. It creates a formidable barrier that prevents the vast majority of airborne particulates from ever entering your living space. Investing in a tight building envelope by upgrading windows is a far more fundamental and effective approach to IAQ than running an appliance 24/7.
Think of it in these terms: running an air purifier in a house with drafty windows is like trying to bail out a leaky boat without plugging the hole. You are fighting a constant, losing battle against incoming pollutants. By first investing in properly sealed windows, you dramatically reduce the contaminant load that your indoor environment has to handle. This not only creates a healthier living space but also allows any secondary measures, like an air purifier, to work far more effectively and efficiently, as they are tasked with “polishing” the air rather than performing heavy-duty filtration against a constant influx of outside smog. The best air purifier is the one you rarely need because your home is properly sealed.
Key Takeaways
- The financial loss from single-pane windows often exceeds $400 annually, making replacement a sound investment rather than an expense.
- Window frame material is critical for longevity; fiberglass’s low thermal expansion prevents warping and seal failure common in vinyl frames after 10 years.
- Proper installation, especially caulking and flashing, is more important than the window itself. Errors can void warranties and cause structural rot.
Repainting the Walls: How to Achieve a Streak-Free Finish Like a Pro?
This final step is not about paint, but what the act of painting represents: the finishing touch on a project well done. After the structural work of a window replacement—the calculations, the material analysis, the vetting of installers—you are left with the final result. A “streak-free finish” is the quiet, comfortable, and energy-efficient home you’ve created. It’s the absence of drafts on a cold winter night, the reduction in outside noise, and the tangible satisfaction of seeing a lower number on your monthly heating bill.
The investment in high-performance windows transforms your home in ways that go far beyond a simple aesthetic upgrade. It’s a fundamental improvement to the building’s performance and the health of its occupants. You have moved from a reactive state of constantly adjusting the thermostat to a proactive state of control over your environment. This is the true “return on investment”: a home that performs reliably, protects your family from outdoor pollutants, and actively saves you money every single day.
Just as a professional painter prepares a surface for a flawless result, you have now done the foundational work. You have addressed the structural weaknesses, sealed the leaks, and invested in materials built to last. The resulting comfort and peace of mind are the “perfect finish” to your home improvement project. The financial savings are simply the proof that your calculated investment was the right one.
The next logical step is to move from analysis to action. To get a precise measure of your home’s energy loss and a tailored plan for replacement, consider obtaining a professional energy audit from a certified technician.