The secret to a high-end bathroom remodel on a budget isn’t shiny faucets; it’s investing in the invisible systems that prevent catastrophic failures and deliver true comfort.
- Focus your budget on robust waterproofing and proper ventilation first, as these are the most common points of failure in any bathroom.
- Achieve a spa-like atmosphere through strategic, layered lighting and smart fixture choices that enhance performance without relocating pipes.
Recommendation: Prioritize upgrading the ‘bones’ of your bathroom (waterproofing, ventilation, lighting) over purely cosmetic changes to maximize your return on investment and long-term satisfaction.
Every homeowner with a dated master bath shares the same dream: transforming it into a serene, spa-like retreat. But that dream often crashes into the expensive reality of a full gut renovation. The number one budget killer? Moving plumbing. The moment you decide to relocate a toilet, sink, or shower drain, costs can skyrocket, involving jackhammering concrete slabs and re-routing pipes through walls. Many people assume that if the layout is fixed, a true transformation is impossible, so they settle for painting the walls and replacing a faucet.
But what if the key to a luxury bathroom experience isn’t about changing the layout at all? As a contractor, I can tell you that the most successful, durable, and satisfying renovations focus on what’s behind the tile and above the ceiling. A true value-added remodel is about upgrading the bathroom’s core systems: its waterproofing, its ventilation, and its lighting. These are the elements that create genuine comfort, prevent costly future repairs from water damage and mold, and deliver that high-end feel you’re looking for.
This guide will walk you through a contractor’s approach to a master bath renovation. We’ll bypass the astronomical cost of moving plumbing and instead focus on smart, high-impact upgrades. We will explore how to build a shower that will never leak, choose efficient fixtures that actually work, and engineer an atmosphere of light and air that feels like a five-star hotel—all while keeping your existing layout.
In this article, we’ll break down the essential systems to focus on for a high-value renovation. The following summary outlines the key areas where smart investments will yield the biggest returns in comfort and durability.
Summary: A Contractor’s Guide to High-Impact Bathroom Upgrades
- Why Grout Is Not Waterproof and How That Destroys Your Subfloor?
- How to Choose a Low-Flow Toilet That Actually Flushes Powerfully?
- Curbless Shower vs. Tub-Shower Combo: Which Adds More Resale Value?
- The Ventilation Fan Mistake That Causes Black Mold on Your Ceiling
- How to Make a Windowless Bathroom Feel Bright and Airy?
- The Lighting Error That Creates Dangerous Shadows Over Your Chopping Board
- How to Prep 5 Days of Balanced Lunches in Under 90 Minutes?
- Kitchen Remodeling: How to Design a Chef-Grade Layout in a Small Space?
Why Grout Is Not Waterproof and How That Destroys Your Subfloor?
Here’s the most dangerous misconception in bathroom remodeling: that tile and grout are waterproof. They are not. Grout is a porous, cement-based product that will absorb water. Over time, water inevitably seeps through microscopic cracks in the grout, bypasses the tile, and reaches the substrate behind it—typically drywall or cement board. Once moisture gets into the wall cavity or subfloor, it feeds the two things you never want in your home: mold and rot. This is a classic failure point that can lead to thousands of dollars in repairs.
The old method of building showers involved a “water in, water out” system with a vinyl pan liner, but these are prone to installation errors and leaks. The modern, professional standard is to create a fully sealed, waterproof envelope directly behind the tile. This is achieved using topical waterproofing membranes. These products are applied to the substrate before any tile is laid, effectively creating a seamless, bathtub-like container.
Leading systems use advanced materials to ensure total protection. For example, a modern waterproofing system often consists of an 8-mil-thick membrane with 200% elongation capacity, which allows it to bridge cracks and move with the house without tearing. All seams, corners, and plumbing penetrations are sealed with specialized banding and collars. This method ensures that not a single drop of water ever reaches your home’s structural framing, guaranteeing the long-term system integrity of your shower.
Ultimately, what you don’t see behind the tile is far more important for the longevity of your bathroom than the tile itself. Insisting on a topical waterproofing membrane is non-negotiable for a lasting, high-quality renovation.
How to Choose a Low-Flow Toilet That Actually Flushes Powerfully?
Early-generation low-flow toilets rightfully earned a bad reputation. They saved water but lacked the flushing power to do their job effectively, leading to clogs and the dreaded “double flush.” Thankfully, technology has come a long way. Today’s high-efficiency toilets are true performance fixtures, designed with advanced fluid dynamics to deliver a powerful, effective flush using 1.28 gallons per flush (GPF) or even less, compared to the 3.5 to 5 gallons used by older models.
The secret lies in the engineering. Instead of simply releasing water from the rim, modern toilets use features like larger trapways to prevent clogging and innovative flush valves that push water into the bowl at a higher velocity. Some designs create a cyclonic or vortex-like action, using the shape of the bowl and the force of the water to scrub the entire surface clean with every flush. This powerful, targeted water flow is what allows them to perform better while conserving a significant amount of water.

When shopping, don’t just look at the GPF rating. Look for toilets with a high MaP (Maximum Performance) score, which is an independent rating that measures how much waste a toilet can remove in a single flush. A score of 800 to 1,000 grams is considered excellent. Choosing a toilet with a high MaP score ensures you get both water efficiency and the powerful flush you need, finally putting to rest the fear of weak low-flow performance. This upgrade provides a spa-like luxury feel without needing to change any of the underlying plumbing.
This is a perfect example of a smart upgrade. For a relatively modest cost and with no changes to your plumbing, you get better performance, lower water bills, and a more modern-looking bathroom.
Curbless Shower vs. Tub-Shower Combo: Which Adds More Resale Value?
One of the biggest layout decisions that *doesn’t* require moving the main drain is choosing between a walk-in shower and a traditional tub-shower combo. The answer largely depends on your target market and the other bathrooms in your home. A tub-shower combo is often considered essential for families with young children. If your master bath is the only full bathroom in the house, removing the tub could be a negative for resale value.
However, if you have another bathtub elsewhere, converting to a large, curbless walk-in shower can significantly increase the luxury appeal and perceived size of your bathroom. A curbless design, where the shower floor is flush with the rest of the bathroom floor, is a hallmark of high-end design and a major selling point for aging-in-place buyers. It offers superior accessibility and creates a seamless, open-concept feel. While the installation is more complex, requiring a sloped floor and often a linear drain, the aesthetic and functional payoff is substantial. According to Sherry Holmes of the Make It Right Construction Advisory, strategic bathroom renovations are a top source of ROI.
A full basement bathroom has the highest return on your investment compared to any other bathroom renovations in your home.
– Sherry Holmes, Make It Right Construction Advisory
This highlights the importance of making smart choices that appeal to future buyers. The decision between a curbless shower and a tub combo is a key part of that strategic thinking.
| Feature | Curbless Shower | Tub-Shower Combo |
|---|---|---|
| Installation Cost | Higher (requires precise floor slope) | Standard |
| Accessibility | Excellent (aging-in-place friendly) | Requires stepping over tub edge |
| Target Market | Luxury buyers, older homeowners | Families with young children |
| Space Perception | Makes bathroom appear larger | Traditional, familiar layout |
| Drain Solution | Linear drain or offset drain (like Kerdi-Drain-H) | Standard center drain |
Ultimately, a value-added remodel weighs the needs of your household today against the desires of the market tomorrow. A curbless shower screams luxury, but a tub may be a more practical choice for broader family appeal.
The Ventilation Fan Mistake That Causes Black Mold on Your Ceiling
You can install the most beautiful tile and the most luxurious fixtures, but if you don’t get the ventilation right, you’re creating a ticking time bomb for mold. The single biggest mistake homeowners and even some contractors make is installing an undersized, poorly located, or infrequently used ventilation fan. Warm, moist air from a shower rises, and if it’s not exhausted effectively, it condenses on the coldest surface—usually the ceiling—creating the perfect breeding ground for black mold.
A fan’s power is measured in CFM (Cubic Feet per Minute). The rule of thumb is you need at least 1 CFM per square foot of bathroom area. So, a 100-square-foot bathroom needs at least a 100 CFM fan. For maximum effectiveness, the fan should be located inside or directly adjacent to the shower enclosure. The problem is that many people find bathroom fans loud and annoying, so they either don’t run them long enough or avoid turning them on at all. Running the fan for at least 20-30 minutes after every shower is critical to fully vent the humid air.
A brilliant solution is to install a fan with a timer switch or a humidity sensor (humidistat). A timer allows you to set the fan to run for a predetermined duration and then shut off automatically. A humidistat is even smarter, automatically turning the fan on when it detects high humidity and turning it off when the air is dry. As one homeowner noted in a renovation case study by Driven by Decor, this simple upgrade eliminated the loud noise that disrupted the spa-like atmosphere by allowing for a quieter, remote-mounted in-line fan that could be run for the proper duration without being a nuisance. This is a prime example of focusing on system integrity for long-term health and comfort.
Action Plan: Your Bathroom Ventilation Audit
- Fan Sizing: Check your fan’s CFM rating. Is it greater than or equal to your bathroom’s square footage? If not, it’s undersized.
- Fan Location: Is the fan located directly over or within a few feet of your shower or tub? If it’s by the door, its effectiveness is drastically reduced.
- Switch Type: Do you have a simple on/off switch? Consider upgrading to a timer or humidistat switch to ensure adequate run time without having to think about it.
- Ducting Check: Ensure the exhaust duct is insulated, as short as possible, and vented directly outside (not into the attic), with a gentle slope to prevent condensation from pooling.
- Noise Level: Is your fan so loud you avoid using it? Look into modern ultra-quiet models or remote in-line fans that place the motor in the attic.
Ignoring ventilation is one of the costliest mistakes you can make. A small investment in a properly sized fan and a smart switch protects the much larger investment you’re making in the rest of your bathroom.
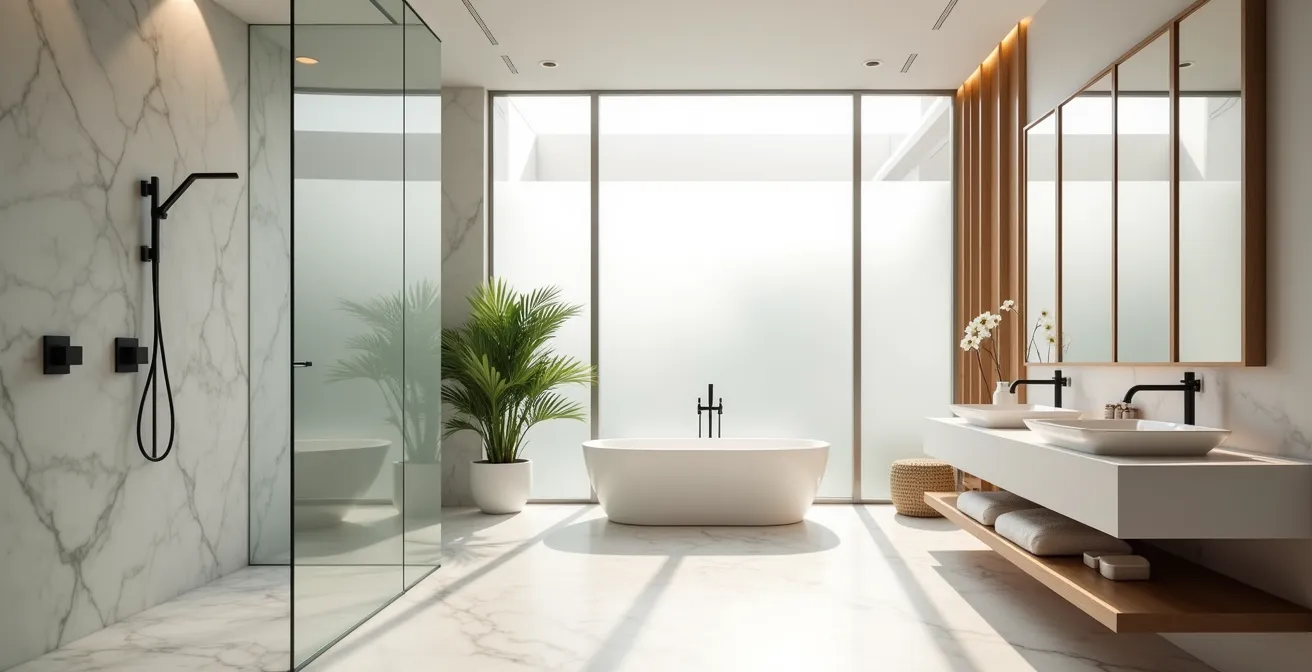
How to Make a Windowless Bathroom Feel Bright and Airy?
A windowless bathroom is a common design challenge, but it doesn’t have to feel like a cave. The solution isn’t just to install a brighter bulb; it’s to practice what designers call atmospheric engineering. This means using multiple layers of light and reflective surfaces to mimic the feel of natural light and create a bright, airy ambiance. A single overhead fixture creates harsh shadows and a flat, uninviting space. A layered lighting plan, however, makes a room feel spacious and welcoming.
Your strategy should include three main layers of light:
- Ambient Lighting: This is the overall illumination for the room, usually provided by recessed ceiling lights (pot lights). Use fixtures rated for damp locations and put them on a dimmer switch for maximum control.
- Task Lighting: This is focused light for specific activities, most importantly at the vanity. This should be shadow-free light for grooming, provided by sconces on either side of the mirror or a backlit mirror.
- Accent Lighting: This is the “wow” factor. It can be a small spotlight on a piece of art, or LED strip lighting tucked into a shower niche or under a floating vanity. It adds depth and a high-end, spa-like feel.

Beyond the fixtures, your choice of surfaces is critical. Large mirrors are your best friend, as they bounce light around the room and create an illusion of depth. Opt for glossy or semi-gloss tiles over matte finishes. And don’t forget the paint. According to home improvement experts, choosing the right paint sheen is a simple but effective trick; satin and semi-gloss paint finishes reflect 35-75% more light than flat or matte finishes, making the entire space feel brighter. A light color palette of whites, soft grays, or pale blues will further enhance this effect.
By combining these lighting and surface strategies, you can completely transform a dark, enclosed bathroom into a bright and airy retreat, no window required.
The Lighting Error That Creates Dangerous Shadows Over Your Chopping Board
While this title talks about kitchens, the principle it describes is even more critical and common in bathroom renovations. The “dangerous shadow” in a kitchen is the one cast by your body over a countertop. In the bathroom, the equivalent error is placing a single light fixture directly on the ceiling above the vanity. This placement casts deep, unflattering shadows under your eyes, nose, and chin, making everyday tasks like shaving, applying makeup, or simply checking your appearance difficult and frustrating.
This is the most common lighting mistake I see, and it instantly undermines any attempt to create a spa-like atmosphere. The solution is to light the face, not the top of the head. This is achieved with task lighting positioned vertically on either side of the mirror. Wall sconces are the ideal choice for this. As a best practice, the center of each sconce should be at roughly eye level, or about 60-66 inches off the finished floor. They should also be spaced properly to illuminate both sides of the face evenly.
In a case study on high-impact renovations that don’t move plumbing, the professional renovators at Mosby Building Arts recommend spacing task lights around 40 inches apart to ensure full, shadowless coverage. This creates a cross-illumination that fills in all the shadows cast by overhead ambient light. If you don’t have space for sconces, a high-quality backlit mirror or a linear fixture mounted horizontally above the mirror can also work well, as long as it’s powerful enough to cast light forward onto your face, not just create a halo on the wall.
Fixing this lighting error is a relatively low-cost change that has a massive impact on the daily usability and perceived quality of your bathroom. It’s a perfect example of smart atmospheric engineering.
How to Prep 5 Days of Balanced Lunches in Under 90 Minutes?
At first glance, this title seems completely out of place. But as a contractor, I see a powerful metaphor here for a successful renovation project. Just as prepping your meals for the week saves you from daily stress, poor choices, and wasted time, properly “prepping” your bathroom remodel project saves you from chaos, budget overruns, and costly mistakes. The 90 minutes you spend planning your lunches is like the crucial planning phase of your renovation—it’s the most valuable time you’ll invest.
Your “renovation meal prep” involves five key ingredients for a balanced project:
- The Recipe (The Plan): This is your detailed design. It specifies every single material, from the exact tile and grout color to the model of the toilet and the brand of the faucets. No decisions should be left to be made “on the fly” during construction.
- The Ingredients (The Materials): Order and receive all materials *before* demolition begins. The number one cause of project delays is waiting for a back-ordered tile or a delayed vanity. Having everything on-site ensures a smooth, continuous workflow.
- The Kitchen (The Contractor): Vet your contractor thoroughly. Check licenses, insurance, and references. Ensure you have a detailed, fixed-price contract that outlines the scope of work, payment schedule, and timeline. This is your most important “kitchen appliance.”
- The Containers (The Protection): Before work starts, prepare the job site. Lay down floor protection from the front door to the bathroom. Seal off the work area with plastic to contain dust. Protect any furniture along the path.
- The Schedule (The Timing): Establish a clear start and end date with your contractor. Understand the sequence of events: demolition, plumbing/electrical rough-in, inspection, waterproofing, tile, fixture installation, and final paint.
Rushing into demolition without this level of preparation is like starting your week with an empty fridge and no plan—it guarantees stress and poor outcomes. A smooth, on-budget renovation that doesn’t involve moving plumbing is all about meticulous, front-loaded planning.
Just like a well-prepped lunch, a well-prepped renovation project feels effortless when it’s time to execute, because all the hard decisions have already been made.
Key Takeaways
- A true luxury feel comes from investing in foundational systems—waterproofing, ventilation, and lighting—not just surface-level cosmetics.
- Never assume grout is waterproof. A topical membrane behind the tile is the only way to prevent subfloor rot and mold, protecting your home’s structure.
- Create a spa-like atmosphere through a layered lighting plan (ambient, task, accent) and smart use of reflective surfaces, even in a windowless room.
Kitchen Remodeling: How to Design a Chef-Grade Layout in a Small Space?
Again, let’s translate this kitchen concept to our master bathroom. What makes a chef’s kitchen “chef-grade”? It’s not the expensive appliances; it’s the efficiency of the layout. It’s about workflow, zoning, and having everything you need within arm’s reach. We can apply these exact same principles to design a “spa-grade” bathroom layout, even in a small space and without moving plumbing.
Think of your bathroom in terms of zones, just as a chef thinks of stations. Your primary zones are the “wet zone” (shower/tub) and the “dry zone” (vanity/toilet). The goal is to optimize the workflow between them. For instance, ensure there is adequate, accessible storage for towels right near the shower exit. Place hooks for robes and used towels conveniently. At the vanity, every drawer and cabinet should have a purpose. Use drawer dividers and organizers to create specific homes for toiletries, grooming tools, and cleaning supplies. This “everything in its place” philosophy is borrowed directly from a professional kitchen and is key to maintaining a calm, uncluttered, spa-like environment.
A floating vanity is a perfect example of applying a chef-grade principle. It makes a small bathroom feel larger by showing more floor space, and the area underneath can be used for a discreet scale or a basket for towels. Likewise, recessed shower niches are the bathroom equivalent of a spice rack—they keep shampoos and soaps off the floor and within easy reach, maintaining clean lines and an efficient workflow. This is about maximizing the utility of every square inch, proving that a high-end feel is about smart design, not just size or an expensive layout change.
By focusing on these core systems—waterproofing, performance fixtures, smart layout choices, ventilation, and layered lighting—you can achieve a truly luxurious and durable master bath remodel. You don’t need to move the plumbing; you need to invest your budget where it delivers the most long-term value and daily comfort.